onsdag, maj 29, 2013

How to delete a VM in Windows Azure and not incur any charges

When you want to delete a Virtual Machine and make it not incur any charges to your credit card anymore there are a couple of steps that you need to go thru.

Short story

  1. Delete the Virtual Machine
  2. Wait until the disk is detached from the Virtual Machine
  3. Delete the disk and delete the associated VHD
  4. Delete the Cloud Service
  5. Delete the Storage Account

Long Story

First of all you need to delete the Virtual Machine. This is the easy part and many think that this is enough. One thing that might be confusing is that when you delete a Virtual Machine a Cloud Service appears!

Look at the picture below. It has one VM deployed and zero Cloud Services. This will change when we delete the VM.Now click on Delete at the bottom of the screen with the Virtual Machine selected.

DeleteVM1

Deleting the VM takes a couple of seconds and after this is done you see that you have 0 Virtual Machines but 1 Cloud Service. Where did that come from?

DeleteVM2

If you now click on the Cloud Service link you will see that the Cloud Service you have has the same name as the VM that you used to have. So this is just a trick that we do in the portal to not confuse you but the effect when you delete is somewhat confusing. When you create a Virtual Machine if is actually contained in a Cloud Service but in the portal we hide this for you. If you instead list your Cloud Services in PowerShell you will see all the Cloud Services, including the once that have Virtual Machines connected to them. Just having a Cloud Service with nothing deployed to it does not incur any cost so for now we can just ignore it.

Next step is to delete the disk. Every disk for your Virtual Machines are stored in one of your own Windows Azure Storage Accounts. Storing data in a storage account incur cost so we need to delete this.

Click on the DISKS tab in Virtual Machines and note that before you can delete the disk the ATTACHED TO must be empty. It takes a couple of minutes between you deleting the Virtual Machine and the disk getting detached from that Virtual Machine.

DeleteVM4 

So be patient, what until the disk is released and then click on DELETE with the disk selected. When clicking on DELETE you are presented with two options. Either you Delete the associated VHD or you Retain the associated VHD. If you want to achieve zero cost you have to delete the VHD. But please remember that this will not be a reversible action and the VHD will be delete from your account.

DeleteVM5

With the Virtual Machine deleted and with the VHD associated with the disk attached to the Virtual Machine you are now down to zero in cost for you account. If you want you can now also delete the Cloud Service and the Storage Account by just selecting the corresponding tabs and select delete.

tisdag, maj 28, 2013

Using Live Writer again

Today I decided to start using Live Writer again for my blog and here are some easy steps to set it up. At the moment I run my blog on Blogger.com. Using Blogger is mainly of historical reasons and yes I know, I should move it to Windows Azure and run it on a Windows Azure Web Site!

Live Essentials

First of all you need to install Live Writer which is a part of Live Essentials. Download it and install it but make sure that you don’t install the apps that you don’t need. Live Essentials also include things like Messenger and some other apps.

Code Snippet Manager

While being a developer and blogging every once in a while you need to post code. Or at least you should! To post code PreCode Code Snippet Manager is a great plugin and also a desktop client.

PreCode Code Snippet Plugin

Drafts folder

To be able to sync drafts between different computers you can add an easy registry hack to change the posts folder.

Open regedit and navigate to HKEY_CURRENT_USER\Software\Microsoft\Windows Live\Writer and add a new string value named PostsDirectory. Create a new folder on your computer in a SkyDrive or Dropbox folder and set the path to that folder in the string value PostsDirectory. Live Writer will create two folders named Drafts and Recent Posts. So, now its easy to start writing a post on one computer and continue on another.

Adding possibility to open older posts

To be able to open posts from your blog that you haven’t written with Live Writer you can use this excellent guide: http://www.technize.net/open-and-edit-any-post-in-windows-live-writer-2012/

fredag, maj 17, 2013

How much Windows Azure resorces am I using?

To check how much resources you are using in Windows Azure is really simple but might be tricky to find and understand. The only account that can access the account information is the account owner. That is the account used to sign up for Windows Azure the first time. If you are a co admin on an account you can not access this information.

The place to start is the Windows Azure Account Center located at https://account.windowsazure.com If you are not signed in you need to do so with the Microsoft Account from the account owner. Once you are signed in you click on link to Account Center marked below:


This will take you to an overview of all the subscriptions you have. As you see in the picture below I only have one subscription called "3-Month Free Trial". The name of the subscription is actually a button taking you to the page with the interesting stuff! So lets click on it! The exact layout of the picture below might vary. In this case I have removed the spending limit and the text on the orange bar below is telling me that I have 89 days left of my trial. If you have an account with the spending limit still there it would have said something like: "This account have a spending limit. Click here to remove it."


On the following page can now see how much resources you have and how much of the included resources that you have spent.


Here I would like to point out some important things:
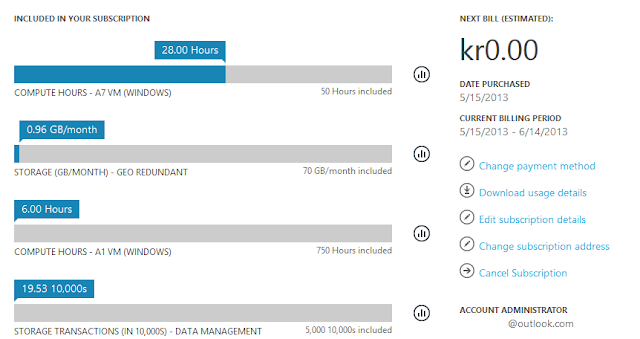
  • You will only see bars for the resources that you have used in the current billing period. So in this example I have NOT created any Windows Azure SQL Databases and hence that bar will not show up in the overview.
  • In my account I have 50 hours of Compute Hours of A7 VM included and I have used 28. This is indicated with the blue bar at the top.
  • My next bill is estimated to kr0.00 since I'm only using the resources that are included in my current subscription.
  • You can see the dates for the current billing period on the right side. Once I reach the end of the billing period I will get new resources on my account and all the bars will be reset.
  • If you click on the "Change payment method" you can change the credit card that gets charged and you can also add multiple credit cards.
  • "Download usage details" lets your download a csv-file containing all the information about what services you have used that led to your bill. Great for running BI reports in Excel!
  • If you click on "Edit subscription details" you can change the name of the subscription. This is really good if you are co admin on multiple subscriptions.
  • The data on this page is not live. I think it has a 13 hour delay.
  • Note that the amount on the right hand side is only an estimate. So this number might be higher than your actual current value since we are using previous consumption to estimate your month total.

I think this is the most important thing you need to know about the Windows Azure Account Summary page.

Create a VM of the new High Memory instances (A7) in Windows Azure

When we launched Windows Azure Infrastructure Services in mid April we also introduced two new Virtual Machine sizes. These are called A6 and A7. The A6 corresponds to a Large VM with four cpu cores but with 28 GB RAM instead of the standard 7 GB. The A7 corresponds to a Extra Large VM with eight cpu cores and with 56 GB RAM instead of the standard 14 GB.

This VMs are perfect for workloads that require a lot of memory. This could for instance be running a SQL Server on a VM. The new VM sizes are now also available for Cloud Services with the release or Windows Azure SDK 2.0.

To create a new VM based on the new size is really easy and can be done directly in the Windows Azure Management Portal.

Click on New in the left hand corner and select Compute – Virtual Machine – Quick Create:


Here you can now see the new VM sizes. Select A7, enter a DNS name, username and password and you are good to go! You can also select the Location where you VM should be placed. Microsoft have data centers in eight locations today. After you have entered these settions, click on CREATE A VIRTUAL MACHINE, take a cup of coffee and enjoy.

When you VM is running you can now easily connect to it via Remote Desktop. Click on the link to Virtual Machines in the menu on the left side and then Connect at the bottom of the page with you Virtual Machine selected:


This will open a RDP session and you can sign in with the credentials that you chose earlier.

Windows Azure Benefits in BizSpark

As a member of Microsoft's program for startups BizSpark you have a lot of Windows Azure resources for free each month! Each BizSpark company gets up to eight MSDN Ultimate and each MSDN Ultimate have Windows Azure resources at a value of $6500 annually.

This post will guide you in how to maximize the usage of your Windows Azure benefits in BizSpark!

To activate your BizSpark Windows Azure benefits you need only three things. You need your Microsoft Account (aka Live Id) that is associated with BizSpark, you need a credit card to verify your credentials and you need this url: http://www.microsoft.com/bizspark/Azure/Default.aspx

The url above will take you to this page:


Here you can read more about Windows Azure and also click on the big orange button saying “Activate Windows Azure now“.

If you are signed in with the Microsoft Account connected to BizSpark you will get to this page:


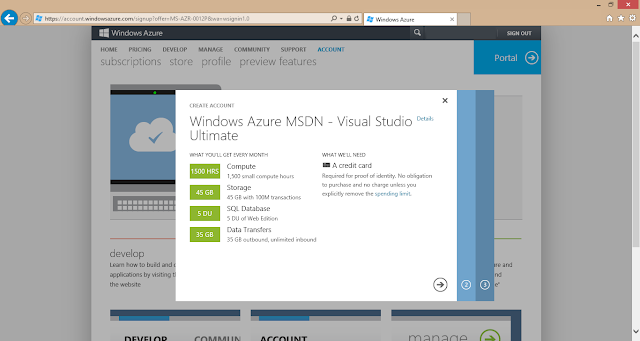
Here you can see what Windows Azure resources that are included in BizSpark and continue with the sign up process. As I mentioned above you will need a credit card to sign up. This is primarily used to prevent fraud.

If you already have created a Windows Azure account for your main BizSpark account you can create a new MSDN Subscription for another Microsoft Account (Live Id). Each BizSpark membership can have up to eight MSDN Accounts.

To add a new MSDN Account to your BizSpark membership you sign in to the BizSpark Portal at http://www.microsoft.com/BizSpark/ Click on the link to My BizSpark and on the left hand side click on Members under the Manage headline. This will take you to this page:


Here you can now add a new member to you BizSpark team. This member with a Microsoft Account will be awarded a MSDN Ultimate Subscription. Sign in to http://www.windowsazure.com with this newly added account and you will have even more Windows Azure resources at your disposal.
And if you are a Swedish startup and thinks BizSpark sounds cool, ping me on beriksen@microsoft.com and I will hook you up with the right person!

tisdag, april 16, 2013

Windows Azure Virtual Machines nu släppt!

Nu är Windows Azure Virtual Machines släppt!

Microsoft erbjudande för Infrastructure as a Service (IaaS), som vi kallar Windows Azure Infrastructure Services, lämnade idag Preview och är nu i produktion! Det var i juni 2012 som vi först visade upp våra tjänster för att köra IaaS och sedan dess har den varit i preview. Preview har i det här fallet inneburit ett begränsat SLA, begränsad support och rabatterat pris. Allt detta är nu förändrat och vi lämnar full support och ett SLA.

Operativsystem

Tjänsten Virtual Machines erbjuder en infrastruktur för att distribuera en applikation. Denna infrastruktur kan bestå av persistenta diskar för operativsystem, persistenta diskar för data och nätverk för att sy ihop hela lösningen. Vilket operativsystem du väljer att köra är helt upp till dig och vi erbjuder möjligheten att skapa nya virtuella maskiner baserade på t ex Windows Server 2012, Windows Server 2008 samt ett antal av våra partners Linux-baserade distributioner som openSUSE, Ubuntu och CentOS. Förutom det finns det även ytterligare varianter på färdiga images på http://vmdepot.msopentech.com/

Applikationer

Med vår tjänst Windows Azure Virtual Machines vill vi skapa en plattform där våra kunder och partners enkelt kan distribuera existerande applikationer och dra nytta av minskad kostnad och ökad flexibilitet i sin IT-miljö. Det kan handla om att migrera hela existerande miljöer som består av flera virtuella maskiner eller att t ex bara flytta en SQL Server som sedan blir en del i en molnbaserad lösning.

I och med att vi nu släpper Windows Azure Virtual Machines i produktion så erbjuder vi också support för flera av våra egna serverbaserade applikationer. Bland dessa finns SQL Server, Windows Server Active Directory, Sharepoint Server samt BizTalk. En komplett lista hittar du här.

Jag vill komma igång!

För att komma igång med Windows Azure Virtual Machines behöver man skapa ett konto. Det gör man enklast genom att besöka http://www.windowsazure.com och skapa ett gratiskonto. Dessa konton är helt gratis i 90 dagar men det finns begränsningar för hur mycket resurser man kan använda. Om man går i taket på någon av de resurser som ingår så kommer kontot att stängas ner tills nästa 30-dagarsperiod startar. Det går självklart att ta bort denna spärr och konvertera ett gratiskonto till ett riktigt konto. Här finns en guide som går igenom hur man skapar ett konto samt hur man skapar sin första Windows Azure Virtual Machine.

Men hur funkar det egentligen?

En viktig del av Windows Azure Virtual Machines är de persistenta diskar som både operativsystem och data ligger på. För att skapa en så sömlös upplevelse som möjligt hanterar vi allt som har att göra med dessa diskar direkt från vår hypervisor. Diskarna exponeras som SATA- (operativsystem) och SCSI- (data) hårdvara och för den virtuella maskinen ser det ut som lokala diskar men i verkligheten ligger de på ett Windows Azure Storage Account. Eftersom att samtliga diskar sparas i ett Storage Account har du som kontohavare full tillgång till filerna. Samtliga diskar sparas också i tre kopior för high availability.

Eftersom att alla diskar som används i Windows Azure Virtual Machines är baserade på samma virtualiseringsteknik som på Windows Server kan man flytta existerande virtuella maskiner från on premises till molnet men också från molnet till on premises. Det gör att man får en väldigt flexibel miljö för att snabbt flytta hela eller delar av en miljö. Att flytta maskiner kan man antingen göra direkt i portalen eller via Power Shell.

Jag vill lära mig mer om Windows Azure!

Nästa vecka kommer två event där det finns möjlighet att lära sig mer om Windows Azure:
 
Windows Azure Conf är en onlinekonferens som sänds från Microsofts huvudkontor i Redmond. Den börjar kl 19.00 och i anslutning till det kommer vi att köra ett Windows Azure Hackathon på Microsofts kontor i Akalla, Stockholm. Vi börjar kl 13.00 och avslutar med att se keynote och de första sessionerna streamade online. Anmälan här!


Global Windows Azure bootcamp är ett event som drivs av engagerade Winows Azure-experter utanför Microsoft. Under samma dag kommer det att genomföras på ca 100 ställen runt om i världen. Kolla in ditt närmaste och hoppas att det finns plats! Mer info här!

onsdag, mars 27, 2013

Windows AzureConf.Local


I anslutning till Windows AzureConf den 23 april kommer vi att köra en Windows Azure Hackathon: Windows AzureConf.Local. Det blir ett event med Windows Azure-experter från både Microsoft och andra företag.

Windows AzureConf.Local är en gratis konferens av utvecklare, för utvecklare. Ta chansen att komma till Microsoft, samarbeta med andra utvecklare och lyssna på experter som har erfarenhet av att använda Windows Azure i skarpa projekt. Du kommer att lära dig mer om webutveckling, mobila tjänster, virtuella maskiner och annat i Microsofts breda molnplattform.

Om du vill kan du ta chansen att jobba på ett eget projekt och få handledning och support av personer på plats eller så gör du någon av de många labbar som finns tillgängliga.

Om du har väntat på möjligheten att höra hur andra utvecklare har nått framgång med Windows Azure är det här ett event du inte får missa!

Vi börjar kl 13.00 och klockan 19.00 kommer vi att sätta igång streamad keynote från Windows Azure.Conf i Redmond med Scott Guthrie. Efter det fortsätter vi med streamade sessioner fram till kl 22.00! Windows AzureConf online fortsätter till kl 05.00 och avslutas ytterligare keynote av Scott.

Passet med sessioner kommer att inledas av mig och Kristofer Liljeblad (aka Batman & Robin eller Piff & Puff) där vi ger en översikt av Windows Azure och garanterat kommer att beröra det absolut senaste nyheterna i plattformen. Utöver det kommer vi att ha en mängd sessioner redo och låter deltagrna rösta eller önska innehållet.

Registrera dig gratis på: http://aka.ms/AzureConfSweden

Agenda:
13.00 – 18.00
Sessioner, diskussioner och koding
18.00 – 19.00
Mat, dryck och mingel
19.00 – 20.00
Online Keynote av Scott Guthrie
20.00 – 22.00
Sessioner streamade från konferensen

Virtual Machines in Windows Azure

Before deploying your first Virutal Machine to Windows Azure you need to create an account. There are several different free offers but everyone is connected to your Microsoft Account. So if you for instance have a MSDN Subscription and Sign Up for a Trail Account on http://aka.ms/TryWindowsAzureNow with that same Microsoft Account your MSDN Benefits is instantly activated. The same goes for BizSpark members.

Deploying your first Virtual Machine!


With an active account it’s now time to deploy your first vm in Windows Azure.
 
  1. Go to http://manage.windowsazure.com and sign in with your Microsoft Account
  2. Click on New in the left hand corner and select Compute – Virtual Machine – Quick Create
  3. Now you need to go thru a few easy steps:
  4.  
    1. Enter a name for you VM. This name must be unique in the .cloudapp.net namespace and will be checked immediately.
    2. Select the Image that you want to use. In this guide I will use Windows Server 2012.
    3. Select the size of your VM. Here I have created a Large VM.
    4. Enter a password. This password will be used when you remote access the VM.
    5. Select the location. If you are based in Sweden the closest data centers are North Europe or West Europe.
    6. Click on Create Virtual Machine and your VM will be created! This takes some time but in a few minutes you will be able to access it from your computer. When the VM is created you will see this message:
  5. Now click on Virtual Machines in the menu on the right hand side and you will see that your VM is in a Running state:

  6. Click on the name of the VM to see more information about that running instance:

  7. Click on Configure. On this page you can now change to size of the Virtual Machine. Change this to Extra Large and then click on Save on the bottom of the page:


    This will force the VM to restart and when it has restarted it will be running on a new VM with the requested resources.
  8. Go back to the overview and click on Connect at the bottom of the page:

  9. Sign in the VM via Remote Desktop and use the password chosen in step 3.4

Spending limit

By default there is a spending limit on a newly created account on $0. This means that you won’t risk getting charged if you are about to use more resources then what’s included in your benefits. If you do so, your account will end up in a read only state and your Virtual Machines (VM) will be suspended. When you enter a new 30-day period and get new resources on your account, it will be active again.
 
My recommendation is that you remove the spending limit as soon as you want to make sure that the VM’s or cloud solutions always are available.
 
You can read more about the spending limit here: https://www.windowsazure.com/en-us/pricing/spending-limits/

The following is how you can remove your Spending Limit:
  1. Log in to the Windows Azure Account Center
  2. Click Accounts
  3. Click Subscriptions
  4. Select a subscription e.g. Subscription 1
If the subscription has been disabled due to the Spending Limit being reached, click this notification: "Subscription reached the Spending Limit and has been disabled to prevent charges." Otherwise, click "Remove spending limit" in the Tasks area. 

tisdag, mars 05, 2013

Android och Windows Azure Mobile Services

Nu har vi tagit ytterligare ett steg i Windows Azures inblandning i open source-utveckling och släpper nu stöd för Android i Windows Azure Mobile Services. Mobile Services gör det enkelt för utvecklare att bygga en skalbar backend i Windows Azure för olika typer at klienter. Sedan tidigare har vi stöd för IOS, Windows Phone 8 och Windows 8.

SDK för Android, som utvecklades av Microsofts dotterbolag Microsoft Open Technologies, är tillgängligt på GitHub.

Tillsammans med Microsoft Open Technologies utvecklade Windows Azure-teamet integrationen med portalen samt stöd för push notifications.

Genom att använda tjänsterna i Mobile Services förenklar man datalagring, autenticering genom Microsoft Account, Facebook, Twitter och Google samt push notificaitons till samtliga plattformars egna system för notifieringar. Oavsett om du bygger en app för Windows Store, iPhone, iPad eller Android och vill ha snabbt och enkelt skapa en backend, push notifications och autenticering för din app så tillhandahåller Mobile Services dessa egenskaper för utvecklare.

http://www.windowsazure.com kan du skapa ett testkonto för att köra upp till tio Mobile Services gratis. Det finns nu också tutorials för att komma igång med tjänsterna mot Android.


tisdag, november 06, 2012

Windows Azure is fast!

http://www.meetwindowsazure.com/fast har Windows Azure teamet i Redmond lagt upp en tävling som går ut på att man ska visa något snabbt på Windows Azure. Tävlingen pågår till 9 november och är öppen även för svenskar!

Så spela in en kort video och ladda upp den på http://www.meetwindowsazure.com/fast så har du en chans att vinna en resa till Las Vegas!

Om inte annat så kan du gå in och rösta på några av de svenska bidragen från Magnus Mårtensson och Alan Smith.


Om du skickar in ett eget bidrag så maila mig så ska jag lägga upp en länk till den här!